InstantVap Turbo Maintenance
InstantVap Turbo - Information, Maintenance and Servicing
InstantVap Turbo - Information, Maintenance and Servicing
We are here to ensure your InstantVap works day after day, month after month and year after year.
-
Service your InstantVap at Buzzbee
-
Australia-wide Servicing
-
Repairs
-
Parts & Accessories for your InstantVap
Working with your InstantVap
-

Maintenance of the Turbo Compact
Clean the unit at least after every 100 treatments.
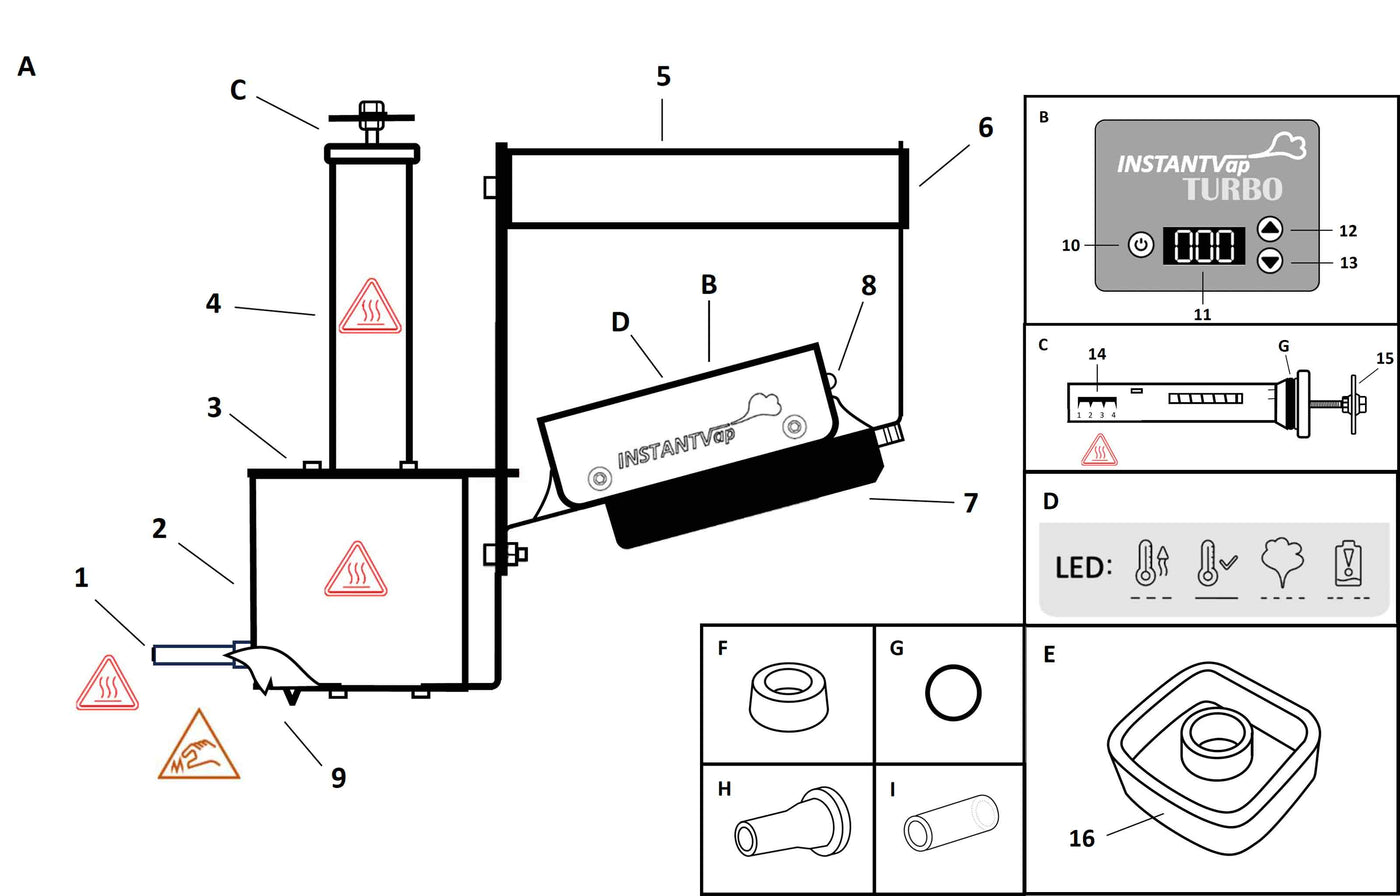
Put on your safety gear, including your gloves, mask and safety glasses. Make sure the unit is not clogged. Heat up the unit in case it is cooled. Turn the unit off and remove battery. Remove dispenser (C) from unit. Fill the silicone cleaning cap (F) with water. Turn the heated unit upside down and push the cap on the dispenser’s tube (4). Keep pushing the cleaning cap very hard, point the outlet tube (1) away from you and turn the unit back. Repeat it until the unit does not generate any more steam. WARNING! High pressure and hot steam!
Rinse the cooled unit by adding a full cap of water through the dispenser’s tube (4), shaking it and draining it through the dispenser’s tube (4). Repeat until the drained water is clear. Heat the unit to around 115ºC (240ºF) to dry up any water remaining in the unit. Let it cool.
Clean the outside of the unit by wiping it with a damp cloth. The dispenser is to be washed in water. Add a drop of mineral oil or grease to the O-ring (G) to increase lifespan and ease of use. Store the unit in dry and clean state.
The silicone insulation cover (E) is to protect the unit from falling oxalic acid. Remove dispenser from unit. Position the silicone cover with the curved side (16) in the front. Push the silicone cover on the top of the unit (3) through the dispenser’s tube (4). Make sure to push it all the way down and not to leave any gap between the cover and the top of the unit.
The tapered silicone insulation (H) is to protect heat-sensitive materials from the hot outlet tube (1). Push it onto the outlet tube.
The silicone insulation tube (I) is to protect heat-sensitive materials from the hot outlet tube (1). Push it onto the outlet tube.
-

Operation
Make sure you set your unit as described in paragraph Functions and Setup.
Remove dispenser (C) from device. Set your dispenser at the desired dosage. The dispenser can be adjusted by turning the handle (15) while checking the indicator (14). The numbers on the indicator correspond to the grams of oxalic acid the dispenser holds. It can be set from 1 to 4 grams.
Do not twist past indicator. Place dispenser back in device.Connect your battery to the battery socket (7). The unit enters OFF mode. Press the ’power’ button (10) to turn on the unit. The LED light (8) starts blinking slowly, indicating that the unit is heating up. Wait until the LED light turns to steady-on. At this point the unit is heated and ready.
Place the vaporiser in place for treatment. Remove the dispenser from device and press dispenser into oxalic acid to collect dose, then place it into device and depress. The LED light turns to blinking rapidly. Allow the treatment to be completed. The unit indicates the completion of the treatment by the LED light turning to blinking slowly or steady-on. At this point you can place the unit ready for the next treatment and re-load the dispenser. As soon as the LED light turns to steady-on, you can apply the next dose. Keep repeating until all your treatments are finished or your battery is discharged.
The unit indicates the discharged battery by ’double blink – pause’. The unit does not heat while a discharged battery is connected.
The LED light patterns are shown on the top of the unit (D) for your reference.
After finishing treatments, turn off the unit, remove battery from socket and charge battery. Clean the unit and allow it to cool down.
-

Troubleshooting
The LED display (11) does not light up after connecting the battery:
- your battery might be faultyThe unit does not heat and the LED light (8) double blinks and pauses:
- your battery is discharged. The LED display (11) also shows ’Lo bat’.The start of the treatment is long delayed after applying oxalic acid:
- the heating chamber (2) may be covered with charred residues. Contact manufacturer or
dealer for instructions.The unit heats up very slowly or unable to heat over around 100ºC (210ºF):
- water residue may be in the heating chamber (2). Let it boil off.The LED display (11) shows ’Lo bat’:
- your battery is discharged.The LED display (11) shows ’Sen Err’:
- the temperature sensor is faulty. Contact manufacturer or dealer.The LED display (11) shows ’Heaters Faulty’:
- the cartridge heater is faulty. Contact manufacturer or dealer.The dipsenser (C) pops out after dosing:
- the outlet tube (1) is clogged.The outlet tube (1) is clogged:
- warm the outlet tube with a blowtorch or drill into the outlet tube with a max. 3mm drill.The outlet tube (1) keeps clogging:
- the outlet tube is in contact with wet materials that keeps cooling it down.
- the outlet tube is loose, tighten it hard with pliers.The dispenser (C) fits very tight:
- add a drop of mineral oil or grease to the O-ring (G).The dispenser (C) fits too loosely:
- change O-ring (G).Oxalic acid does not stick in the dispenser (C):
- add one teaspoon of water to your container of oxalic acid to increase its moisture level.
- or immerse dispenser in water before loading.


Warranty
2-year manufacturer warranty is provided for the InstantVap units (accessories are not included). In case of any failure, please enter your enquiry below.